|
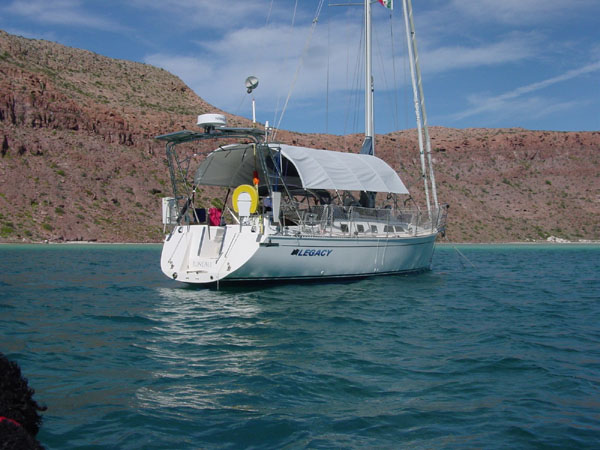
Saga yachts are designed and built to be offshore cruisers and have
generally good storage and layouts for that purpose. They come with
things like lee clothes already installed on the settees and a rail and belt
for the kitchen. Later models have improvements in many details.
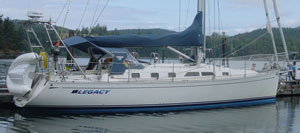
Legacy, hull number 26, has had lots of small and large customizations that suit her
better for our use and tastes. Kitchen Storage
The kitchen is well laid out for use both at rest and at sea. There
were small
 problems with the area under the sink. As originally laid
out the entire space under the sink cabinet was one large open space.
On the end of the cabinet there was a door hinged at the bottom with a small
trash bag holder attached to the door. There were two issues with
this. One was that the trash bag holder held a tiny bag (about the
size of a garbage sack) that filled up about twice per day. The second
was that if you opened the trash door when heeled to port, all the pots and
pans shifted downhill and jammed the trash door open so it couldn't be
closed. The second problem was making efficient use of the fairly large
volume available under the sink. Items put in tended to shift about
randomly and chaos resulted. A complication with work in this cabinet
was that there was storage, a thru-hull, and mechanical items under the cabinet accessed through the floor
of the cabinet. We started by buying the largest plastic trash basket
that would fit into the cabinet door. This had to be mounted with
dropped supports on the door, but holds a full size kitchen trash bag and
still opens and closes as designed. A custom bungee cord holds the
basket against the door and down onto the base supports. problems with the area under the sink. As originally laid
out the entire space under the sink cabinet was one large open space.
On the end of the cabinet there was a door hinged at the bottom with a small
trash bag holder attached to the door. There were two issues with
this. One was that the trash bag holder held a tiny bag (about the
size of a garbage sack) that filled up about twice per day. The second
was that if you opened the trash door when heeled to port, all the pots and
pans shifted downhill and jammed the trash door open so it couldn't be
closed. The second problem was making efficient use of the fairly large
volume available under the sink. Items put in tended to shift about
randomly and chaos resulted. A complication with work in this cabinet
was that there was storage, a thru-hull, and mechanical items under the cabinet accessed through the floor
of the cabinet. We started by buying the largest plastic trash basket
that would fit into the cabinet door. This had to be mounted with
dropped supports on the door, but holds a full size kitchen trash bag and
still opens and closes as designed. A custom bungee cord holds the
basket against the door and down onto the base supports. A second bungee controls how far the door opens.
 To control
movement of items stored in the cabinet, but still allow access to the under
cabinet space we added dividers that slot together like box dividers.
One prevents objects from sliding under the trash bin, another creates
storage for narrow objects like frying pans and cookie sheets. The
large pots and pans are contained in stacks that have so far proven stable.
To utilize the large cubic volume at the top of the cabinet outboard of
the sink we added a shelf for holding large, but rarely used items like the
pressure cooker.
Engine Driven Heater
To warm the cabin in cool weather when the engine is running we installed a
Dickinson Radix heater under the bottom step of the companionway ladder.
This heater takes hot water from the engine and runs it through a small
radiator and blows air through the radiator with two computer type fans.
In cool northern water, or offshore a little warmth in the cabin is greatly
appreciated when motorsailing. This mounting location made for a
minimum of hose length because it is right at the front of the engine
compartment. Plus we had spent many months scratching our heads trying
to determine where we could put a heater in. This was easy to install
in that it is completely self contained. Other remotely mounted
heaters required wiring of remote control panels, air hoses, and grills.
So this seemed a good compromise. Since we have been so long in the
tropics this is one piece of equipment that we have not used. Because
of its installation at the front of the engine compartment it allows
additional engine noise into the cabin. We'd like to design a cover
that would seal the opening when the heater is not being used, but not
interfere with the usual removal of the companionway stairs. Under Floor Storage
Although many of the floor panels were designed to lift for storage access,
we found several large areas suitable for storage that were not accessible.
We added extra removable floor panels to the aft cabin, the kitchen, under
the nav station and in front of the starboard settee. As and example
of space recovered through this effort we can store about eight 8 pound bas
of dog food in front of the settee. Plus items stored under the floor
keep the weight low, which is good.
Bookshelves
As delivered our boat came with a small bookshelf in the forward cabin and a
very narrow shelf along the outboard side of the aft cabin. The
forward bookshelf had such odd dimensions that we often joked that it had
been designed by someone who had heard of a book, but never actually seen
one. We designed three new shelf units to provide storage for the
reference books, guides, navigational tables, and the many paperback that we
carry. Since the interior of the boat is finished in cherry, we had to
invest in much expensive wood for these projects to assure a match in color
and grain. In the forward cabin we added a large shelf above the head of
the bed that can hold three ring binders and other large format items.
Since this occupied the same space as had the reading lights we removed them
and added recessed light to the underside of the shelf. The light is
brighter than before and so better to read by in bed.
At the foot of the bed we removed the original weird shelf and moved it
to the other side of the bulkhead to provide shelf storage in the workshop.
In it's place we added a larger bookshelf designed for standard hardback
books. It holds most of the regular guides and reference books we use.
In the aft cabin we removed the three inch wide shelf that really wasn't
usable for holding anything other than the furled flag. In its place
we installed 140 linear inches (broken up into six shelves) of shelves
scaled for regular paperbacks. We should be able to carry enough for
our own consumption and for trading stock. Since Chris's mother is a
former librarian and refers to the aft cabin as "hers" we have installed a
brass name plate designating the aft cabin as "Joan's Library."
Drawer Stops
Although the original drawers came with a small lip to hold them in place,
we found that in rough seas they would occasionally fly open. Not only
does this create a mess, but in the unlikely event of a real knockdown, the
drawers and their contents could become dangerous projectiles. To hold
the drawers in place when sailing we installed brass inserts threaded for
1/4 bolts into the cabinet fronts. We fashioned aluminum strips with
captive thumb screws that fasten across the cabinet fronts, but that swing
out of the way when the lower fastener is loosened.
Shower Storage
As with many boats today, Legacy has a head that is fashioned as one large
fiberglass casting. The shower has a nice seat in it which concealed a
moderate potential storage spot. We added a round spin in deck hatch
to the front of the shower seat and gained enough storage space for all the
cleaning products.
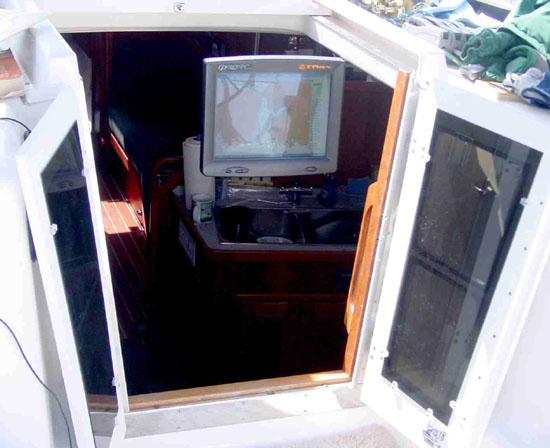
Sunlight Viewable LCD Monitor
 Since we use electronic charts, we really wanted a way to view the display
on deck, but we just couldn't see installing on of the $4000 waterproof,
sunlight viewable screens. We discovered a good compromise in a screen
from Ocean PC with a T-Flex coating. Since this is not waterproof we
mount it on a RAM arm that swings out into the companionway when we are
underway. It has proven to be very usable in even direct sunlight.
And its location at the front of the cockpit is great when you are running
under autopilot or sitting under the edge of the dodger. Mounted in
the "traditional" location on the steering pedestal one would have to stand
behind the wheel to see it. In the companionway one can see it from
the wheel, and from further forward as well. Since we use electronic charts, we really wanted a way to view the display
on deck, but we just couldn't see installing on of the $4000 waterproof,
sunlight viewable screens. We discovered a good compromise in a screen
from Ocean PC with a T-Flex coating. Since this is not waterproof we
mount it on a RAM arm that swings out into the companionway when we are
underway. It has proven to be very usable in even direct sunlight.
And its location at the front of the cockpit is great when you are running
under autopilot or sitting under the edge of the dodger. Mounted in
the "traditional" location on the steering pedestal one would have to stand
behind the wheel to see it. In the companionway one can see it from
the wheel, and from further forward as well.
We also enjoy watching DVDs played on the navigation station laptop on this
screen on warm tropical evenings Anchor Handling
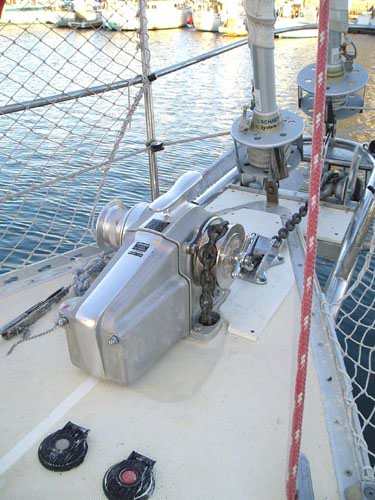
As she came from the factory Legacy had great anchor handling gear on the
bowsprit, unfortunately there was not real way to take the strain off the
chain except for looping it around a cleat, which is not too great. We
installed two chain stoppers in line with each rode so that the strain can
be taken directly to the deck. These heavy duty stoppers are backed up
by 1/4 inch stainless steel plates. In addition, to hold the second
anchor securely we installed a Johnson Marine chain tensioner. At the
same time we added a thick 1/2 inch StarBoard panel to keep the chain from
bouncing on the deck at the bow. This should eliminate wear on the gel
coat and rail in this area.
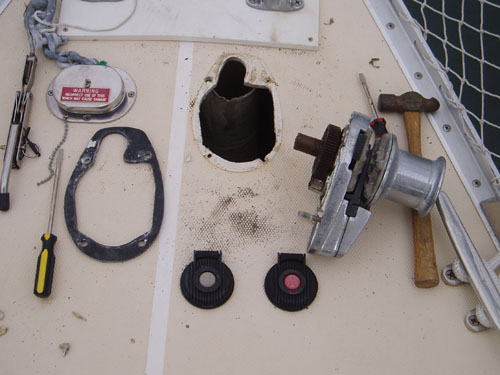
During our first winter in Mexico the factory supplied Lewmar Sprint 1000
windlass expired. It would probably have been fine for years of
vacation
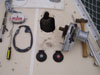 cruising,
but it was not up to the abuse of cruising and daily use. It suffered
from a couple of problems: the cover over the hawsepipe was bolted in place
so that a chain jam in the pipe could be impossible to access; It was very
difficulty to use manually; and using the capstan drum separately from the
chain wheel was awkward and required the use of a screwdriver. The
final cause of death was the motor repeatedly eating brushes and finally
burning up. We replaced the vertical windlass with a horizontal deck
mount windlass for easier access and cruising,
but it was not up to the abuse of cruising and daily use. It suffered
from a couple of problems: the cover over the hawsepipe was bolted in place
so that a chain jam in the pipe could be impossible to access; It was very
difficulty to use manually; and using the capstan drum separately from the
chain wheel was awkward and required the use of a screwdriver. The
final cause of death was the motor repeatedly eating brushes and finally
burning up. We replaced the vertical windlass with a horizontal deck
mount windlass for easier access and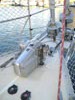 servicing. The model we selected was the Lofrans Tigres.
Installation required that we rebuild the deck to fill the hole left by
removal of the old windlass, slight remodeling of the hawsepipe to accept
the chain smoothly, and creation of a flat mounting surface for the new
windlass. We have been very pleased with the operation of the Lofrans
which seems miles ahead of the old Sprint.
servicing. The model we selected was the Lofrans Tigres.
Installation required that we rebuild the deck to fill the hole left by
removal of the old windlass, slight remodeling of the hawsepipe to accept
the chain smoothly, and creation of a flat mounting surface for the new
windlass. We have been very pleased with the operation of the Lofrans
which seems miles ahead of the old Sprint. Dinghy
Because we travel with the dogs we need to have easy access to the dinghy
several times everyday, and especially right after anchoring! We don't
like to tow a dinghy as it is all too easy to lose it or have various
calamities involving it. At the same time it is too hard to carry a
good size dinghy on deck as the boat really isn't big enough. Some
boats carry a large dinghy on the foredeck, but this make sail handling
there impossible. On the Saga there is not enough room to carry a full
size dinghy on the coachroof.
 That really leaves the stern, but since
we don't like traditional davits we use a two step system. For coastal
cruising we carry the dinghy across the stern using Weaver Snap Davits.
The fittings snap into matching fittings on the stern and the dinghy hinges
up horizontally. Because it is firmly hitched to the transom it makes
a nice loading platform for hauling a person out of the water too. That really leaves the stern, but since
we don't like traditional davits we use a two step system. For coastal
cruising we carry the dinghy across the stern using Weaver Snap Davits.
The fittings snap into matching fittings on the stern and the dinghy hinges
up horizontally. Because it is firmly hitched to the transom it makes
a nice loading platform for hauling a person out of the water too. This is possible because we use a Force 4 RIB from
New Zealand. These seem to be unique among the RIBs (Rigid Bottom
Inflatable) we have seen. On all other RIBs the inflatable tubes are
glued to the hull so that even when deflated the dinghy remains a large and
ungainly item to stow. The Force 4 dinghy uses a system where the
tubes are attached to the aluminum hull with bolt rope like sections that
slide into matching slots in the hull. This allows the tubes to be
completely removed for storage or replacement. Force 4 dinghies are
hard to find in North America, but we will report as to their performance
after a while. We liked our original RIB2.8 model so well that in December
2006 we replaced it with the next larger RIB3.2 model. We ordered it
direct from New Zealand and had a bit of a struggle getting it through US
Customs but are very pleased with it. It is light enough to be easy to
move, but large enough to carry our usual complement of crew and dogs.
When changing to the larger dinghy we also changed to the heavy duty "arc"
type of Weaver davits. Instead of attaching to the dinghy with glued
on patches, these metal arms are attached to fittings bolted to the transom
and the bottom of the hull. Although heavier, the new davits allow a
much sturdier connection of the dinghy to the boat and have the added
benefit of lifting the dinghy a couple of inches higher from the water.
Carrying the 11 foot dinghy across the stern does limit our angle of heel to
about 30 degrees, but the truth is that the Saga 43 does not like to be
heeled over about 25 degrees. For passages or expected rough seas we
ship the dinghy and stow the hull on the coachroof with the tubes rolled up
beneath. The dinghy is the family car for cruisers. Not only is it
used for short trips to the beach or the dock, but it is also called upon
for longer trips to nearby snorkling spots, sightseeing, and occasional
freighting duty. It needs to be as large as possible without being too
heavy to easily pull up on a beach or manage in the davits. It is a
difficult balance to achieve.
Dinghy Wheels
Anyone heading for Mexico and to a lesser degree Central America needs to
invest in a really good set of dinghy wheels for beach landings through the
surf. They need to be strong and long enough to allow the engine to clear
the bottom when they are deployed. The best wheels have large tires
and are easy to change from up to down positions. Avoid wheels that
require the removal and replacement of a pin as they will make you crazy.
The best wheels we have found (and the ones we now use) are made by
DaNard Marine.
Outboard Motor
We started out cruising with a 6 horsepower Tohatsu 4-stroke engine.
It gave us very good service for five years, but it could not get both of us
and our dogs up on a plane for fast travel.
In the fall of 2007 we upgraded to the 9.8 horsepower Tohatsu 4-stroke.
It is the lightest 4-stroke in its class, weighing in at 80 lbs. With
the addition of a Dol-fin it easily gets us up a plane and greatly extends
our range in the dinghy. In Central America's many river anchorages it
had enough power to make progress at all stages of the current. The
9.8 Tohatsu is very popular with cruisers, most of whom have purchased them
from onlineoutboards.com. ShadeTree Awning
Protection from the sun is very important. We have long used a
sunbrella cover over the cockpit at anchor and a smaller mesh shade cover
under way but wanted better sun protection for the decks. We looked
over the various sun awnings that are available and ended up ordering one
from ShadeTree (www.intheshade.com). It is very nicely made and is
supported by carbon/fiberglass rods that rest on the lifelines. These
rods
ShadeTree (www.intheshade.com). It is very nicely made and is
supported by carbon/fiberglass rods that rest on the lifelines. These
rods
 flex
as wind hits the boat from the side allowing the awning to relieve pressure,
then pop back to full shape as the gust passes. The awning cools the
cabin by keeping sun off the decks, and provides a large shady area to
lounge in the breeze on the cabintop. We liked the original so much that we
added a bow shade as well. flex
as wind hits the boat from the side allowing the awning to relieve pressure,
then pop back to full shape as the gust passes. The awning cools the
cabin by keeping sun off the decks, and provides a large shady area to
lounge in the breeze on the cabintop. We liked the original so much that we
added a bow shade as well.
The material in the shade has held up well with only a little restiching
needed after four years of use. We have broken three or four of the
fiber wands so carry a supply of spare wands and support pockets.
For storage the wands fold up (like tent poles) and the whole awning
rolls up into a 9x30 inch bag. If we are only moving during the day
we'll often remove only the last rod (that sits aft of the topping lift) and
bundle the whole thing up and lay it on the floor below decks. We can set up
or take down the whole shade in less than 10 minutes, even when we leave the
wands in place.
Companionway Railing
On the port side of the companionway there is a wall which makes descending
the stairs while on starboard tack safe and easy since you can just lean
against the wall and slide down as you enter the cabin. On the
starboard side however, there is nothing but open space in the stock boat.
When heeled over on a port tack it was very hard to reach the floor without
danger of plummeting into the cabin, or requiring a step to the rail in
front of the stove and then the floor. To solve this problem we had a
stainless steel grab rail fashioned that attaches to the foot of the steps
and to the wall adjacent to the hatch. This arches out at the top and
drops vertically to the floor. It provides a secure brace when
descending the companionway on port tack.
Removable Hinged Doors
Because it is inconvenient to remove and juggle hatchboards a dozen times a
day when living aboard, we fashioned removable doors for the companionway.
In keeping with the Saga philosophy (and our own personal preferences) we
built them out of Starboard. We cut two large openings in each door
and routed a channel on the inside of the doors to accept screen spline to
retain mosquito netting. To attach the doors we were able to take
advantage of the stainless steel plates that Saga uses to surround the
companionway. We removed the plates and through bolted the hinges.
We were able to use a surface mount latch on the inside which engages with
the bottom stainless plate to hold the doors closed. Hooks to hold the
doors open were also added, though we usually remove the doors and stow them
below when we are under way.
|